Introduction (Purpose & Hook):
Improperly packed backpacks cause up to 40% of young hikers’ complaints of back pain. The strain is exacerbated on multi-day treks, resulting in exhaustion, a slower pace, and even injury. Using the proper packing technique at the outset can reduce fatigue by up to 20%, translating into more miles and more trail enjoyment. This post will give you the tools you need to pack as efficiently and comfortably as possible, making every kilometre easier and every camp more accessible.
Principles of Weight Distribution:
The Balance of Biomechanics
When packed properly, a properly tensioned hip belt and frame that transfers weight downward should allow up to 90% of your load to ride on your hips rather than your shoulders.
The best balance is achieved with higher, tighter load placement and shorter, stiffer shoulder straps, which lower energy expenditure and muscle activation. Consider your pack as a tree. To keep it stable, the lighter materials should be placed near the extremities (the pack’s perimeter), while the heaviest core should be near the trunk (your spine).
Strategies for Compartmentalization:
Pockets and Zones
Along with accessory pockets, divide your pack into three main sections: the top, middle, and bottom. Use the top for items you might need on the trail, the middle core closest to your back for dense items, and the bottom for heavy but light items. Organizing items according to their intended use—first aid in one, electronics in another—internal zippered pockets, mesh stash pockets, and a lid pocket help prevent a last-minute camp search.
Partially full loads are stabilized by compression straps (such as the cross-over straps on packs like the Gregory Baltoro), which stop the contents from moving and unbalancing you.
Waterproofing Important Equipment
Use a lightweight trash-compactor liner to line your pack, and then separate essential items (down layers, sleep system) into separate dry sacks. To keep your electronics bone-dry in extremely damp conditions, use roll-top dry bags with a hydrostatic head rating of at least 10,000 mm.
Logic for Gear Prioritization
Your packing order should adapt to changing conditions.
- Rain and Cold: Place insulating layers and waterproof rain gear at the top for quick access when clouds are brewing overhead.
- Hot, Dry Climates: Carry hydration bladders in the rear core zone for cooler temperatures and faster refills; push heavy items lower and out of direct sunlight.
- Technical or Rugged Terrain: On rocky scrambles, carry quick-access trekking poles, headlamps, and maps in shoulder pockets or hip belts to avoid searching through main compartments.e Advanced settings.
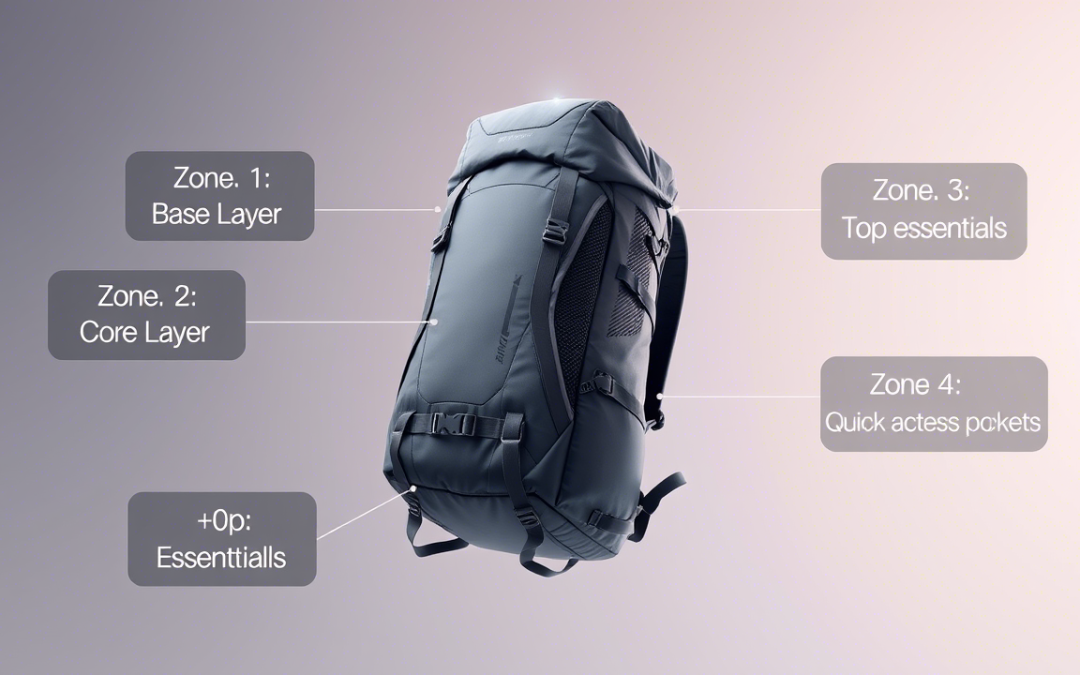
Layering Method Illustration:
The Accessibility Pyramid
- Base Layer (Bottom Zone): Tent and sleeping equipment—items you won’t need until camp; packed last and out of reach.
- Mid Layer (Core Zone): Sturdy, heavy objects near your spine, such as a water reservoir, bear canister, cooking kit, and fuel.
- Top Layer (Upper Zone): Snacks, a rain shell, and a puffy jacket—grab these without dismantling your pack.
- Peripheral Layer (Pockets & Loops): Lash-on loops for quick retrieval, hip-belt pockets, lid pocket, sunscreen, lip balm, map, headlamp, and poles.
Expert Advice
- Foam Pad as Internal Frame: To provide structure and lumbar support in frameless packs, fold or roll a closed-cell foam pad up against your back panel.
- External Versatility Carabiners: There are countless ways to hang dry socks, sandals, or water bottles without adding weight by attaching a carabiner to an external loop or zipper pull.
- Inside-Out Mesh Hack: For convenience and easy access, hang items (like a water filter) inside the same compartment by sewing tiny metal rings beneath the interior zippers.
- Modular Packing Cubes: To switch gear between trips without repackaging everything, use ultralight packing cubes or stuff sacks divided into categories, such as electronics, kitchens, and clothes.
In Conclusion
It’s your turn to try these compartment and layering tips on a day hike. Please track how long it takes to pack and unpack, how comfortable you are going downhill, and make any necessary adjustments. To help other backpackers improve their trail experience, please share your off-grid tips and packing habits in the comments section below. Cheers to happier trails and lighter steps!